My lovely Blogger followers!

Showing posts with label Versafine. Show all posts

Monday, 10 June 2013

Join the Lili of the Valley design team - moi?

Yes, I have some fab news - I've been invited to join the Lili of the Valley design team - woo hoo!  I love their sweet, sweet stamps but haven't really used them much as I have so much else to play with.  But when I was asked to make some samples with my CAS style I enjoyed playing with them so much that I was happy to then be invited to join the very talented team!
 
Today is my debut and we are also holding a Lili of the Valley design team blog hop to celebrate the launch of their gorgeous Pretty Vintage stamps.  Vintage, you say - but I thought I had joined for my CAS style!  Well actually I think I managed to keep to my style and still loved playing with them!  There are 26 new sets and they will be available to buy on the website from midnight (12am) on Wednesday 12th June (UK time) 

The prize is a full set of the Pretty Vintage stamps...
That’s 26 A5 sheets, one each of all the new designs, and it’s worth a massive £325
 
Pretty impressive, huh?!  So, for a chance to win this fabulous prize you need to visit everyone on the hop and leave a comment along the way.
 
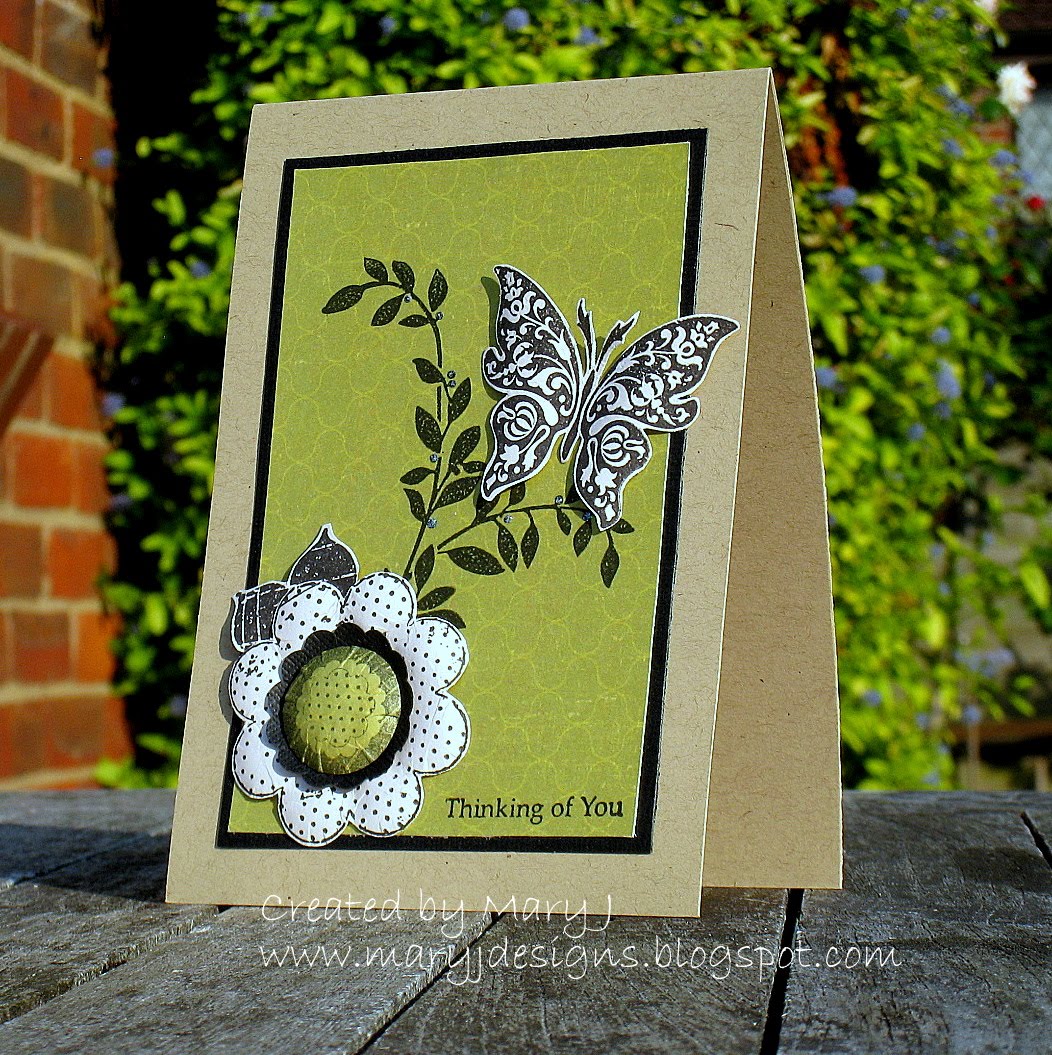
 I really did enjoy playing with the stamps, so much so that I not only made one card, but three!  And I have more half made that I'll be able to share with you over the coming weeks!  So you may want to get a cuppa while I show you my makes!  So without further waffle, here is my first make....
 
I am really pleased with how this one turned out.  I used the butterfly and leaf stamp from Grunge Elements, a sentiment from the Pretty Grungy Good Times set and the papers are the LOTV Petal Fresh collection. I used a selection of Versamagic inks to give a softer look and added a bit of texture for interest.
 
For my second card I used a stamp from the Vintage Background Script set (using Versafine Smokey Grey ink), the leaf and corner stamp from the Grunge Swirls set, the butterflies and postage stamp from the Grunge Elements and a sentiment from the Quotables Go For It set.

My last card is probably to more natural CAS style.  I simply used the True Love sentiment from the Statements Congratulations set against some grungy floral, gingham paper and topped on foam pads for depth.
 
I hope you like my first makes for LOTV!  You should have come from sweet Lou and you now need to hop off to the lovely Mindy.  If you need to start from the beginning or get lost along the way, go to the LOTV blog Ideas to InspireDon’t forget to stop by the Ideas to Inspire blog tomorrow evening when you can find out who the lucky winner is of this fantastic prize


Thursday, 3 June 2010

Embellish Butterflies Color Challenge

I hadn't realised that I had used the colours in the latest Embellish Magazine challenge in yesterday's post, unfortunately it didn't have butterflies on it so wouldn't have counted anyway! But I just adore lime green so I made two cards last night with only one being valid for the challenge as I forgot to add kraft to one! Still, I like them both and hope you do too...


Papers/cardstock: Bazzill black and kraft cardstock, Crate Paper Brook paper
Stamps: K & Co Lotus Floral, Making Memories Flowers, CC Designs "for you" sentiment
Mediums: Versafine Onyx Black ink, Stickles glitter glue
Accents: iridescent gems
Tools: EK Success 1.25" scallop circle punch, Woodware 1" circle punch, butterfly punch

Sunday, 28 March 2010

Who's cookin'? I'm cookin'!!!

I made three cards last night - that is my record of creating 3 different designs in a row! It was down to paper piecing - I'm loving this technique sooo much and I have lots (way far too many) of stamp sets that work really well with it. And as the post title suggests, it's all about cooking!


I just love that BasicGrey paper! And of course I am submitting the cards with fruit paper into their Tuttie Frutti challenge. I am also submitting the last one into the Sketch For You To Try challenge. I've never played along with their challenges before so I'm really pleased I managed one. There are a lot of challenges out there and want to play them all!

Wow, let's see how many I can make tonight!

Papers/cardstock: various Bazzill cardstock, BasicGrey Nook and Pantry paper pack
Mediums: Copic Ciaos, VersaFine Vintage Sepia ink pad, Smooch Molasses and Moonlight (accents on aprons), Papermania "just a note" sentiment
Stamps: Hannah Stamp Kiss the Cook
Accents: ribbon, iridescent dew drops from stash, BasicGrey buttons
Tools: Nestabilities circle dies, Martha Stewart border punch

Saturday, 20 February 2010

Follow your heart - it knows the way

What a great saying, huh? I got the freebie sentiment set when I bought during Stampin' Up's sale-a-bration. I wanted to make a card for one of my dear friends who is going through a divorce at the moment - they're never smooth sailing. I wanted to let her know I'm thinking of her as we live far apart from each other. It's my sort of virtual hug to her.

I used challenges to get some inspiration and I ended up making three cards! The first is for Picture Perfect Creations challenge - Megan left me a lovely comment against one of my blog entries and thought I'd return the compliment by joining in with her very first challenge. Here's the card with the challenge below...


The second and third cards are for Moxie Fab World's Trigger Tuesday challenge, using bright yellow and red based on the picture below...


I'm getting brave with those bright colours now! I tried using them before but my cards always looked like a 3 year old had made them! I think the trick is to use top quality materials in achieving a professional finish. I shaped teh butterfly wings and used foam pads under the yellow matt to keep the cards from looking too plain. And don't ask me how I got the ribbons to twist that way - total fluke, not my skills in ribbon tying!
Enjoy the rest of the weekend!

First card:
Papers/cardstock: Bazzill kraft and other cardstock, BasicGrey Wisteria paper pad
Mediums: Brilliance ink pad
Stamps: Stampin Up Whimsical Words
Accents: ribbon and gems from stash
Tools: EK Success butterfly punches

Second cards:
Papers/cardstock: Papermania linen white cardstock, Bazzill red and yello cardstock
Mediums: Versafine blank ink
Stamps: Stampin Up Whimsical Words
Accents: Bazzill ribbon, Papermania pearls
Tools: Fiskars effervescent border punch, Fiskars Lacy Days of Summer border punch

Sunday, 6 September 2009

Happy Birthday Mum Take Two!!

I'm going to keep this one short after all my waffling yesterday! As I said then, I just wasn't happy with the card I made for my mum's birthday (yesterday's post here). After some cogitating I came up with this version instead...

And here it is front on...


I much prefer this! I think the balance is better and I prefer the less fussy flower arrangement. Now just to create an insert to go with it. And to find someone to give the other card to!
Papers/cardstock: various Bazzill cardstock
Stamps:
K&Co Amy Butler Lotus Floral stamp set, sentiment from Hero Arts Great Flourishes Messages
Mediums: Versafine Onyx Black, VersaMark Dazzle in Frost, for the butterfly VersaMagic in Purple Hydrangea, Perfect Plumeria and Eggplant
Accents: ribbon and flowers from stash, button from BasicGrey Wisteria
Tools: sewing machine,
Fiskars Upper Crest border punch, Spellbinders Label Four

Saturday, 5 September 2009

Happy Birthday Mum!

Luckily my mum is IT illiterate and wouldn't know what a blog was if it was staring right at her! So I can upload the photo of the card I made for her birthday (this coming Friday) and I won't spoil the surprise. Because it's for my mum, I obviously wanted this card to be as special as possible. I'm still not 100% happy about the end result, but I have some time to experiment and improve it before Friday! Anyway, for this card I had three "wants":
  1. To create a card purely from my own imagination and not to rely on any sketches or challenges
  2. To use my sewing machine that she bought me last year and I only learnt to use it a couple of weeks ago (see here)!
  3. To use my DCWV Far East papers as my mum originated from Hong Kong
I failed on the last one. No matter how much I played around with the Far East papers, I just couldn't get any inspiration! I still wanted to stick with the purple shades in there though and ended up creating this...


What do you think? I don't think it's too bad overall, but I don't like the flower arrangement - there's something not right about it but I'm not sure what it is!! It doesn't balance with the sentiment properly either. And I think the satin ribbon is too thin. Will have a think on that...
I do like the butterfly though! It's from the K&Co Amy Butler Lotus Floral stamp set. It wasn't easy to find in the UK, but I managed to buy it from Charmed Cards & Crafts (scroll down half the page via the link). I haven't used it before because I wasn't sure how to make the best of it and what I eventually did was to colour it with three varying shades of purple ink and then used a character shaper and moulding mat (normally used for floral punch craft) to make it pop - I think it worked quite well. You can buy the tools from Crafts U Love here. I also wanted to give the butterfly a slight sheen to it too. You can't see it in the photo, but I used a VersaMark Dazzle in Frost and stamped it directly onto some white thick card. I then dried it with my heat tool and then stamped the inked butterfly onto it. Originally I stamped the butterfly and then the Versamark ink on top but it diluted the colours too much. I then cut out the butterfly and stuck it on with PVA glue.
I used to be rubbish at cutting, but I found micro serrated scissors and now it's easy peasy! Before my cut outs looked messy, but now they look like professional die cuts! Well, perhaps not that good, but pretty close!
The other thing I wanted to mention is that I've eventually done some research into improving how I photograph my cards. I found some very easy cheap solutions but in reality it's really hard to buy the lighting and spend less than £70. Does that sound a lot or not? It's probably not, but I've read on blogs that they've done it on the cheap so I'm reluctant to spend any more than I need too! Anyway, what I did was to create the background using a white A4 folder, thick white paper, double sticky tape (lots of it!) and a cheap £20 desktop adjustable lamp. I haven't yet sorted out a full spectrum bulb but thought the results with the energy saving bulb (11 watt, equivalent to a normal 75 watt) that came with the lamp worked quite well. Here's how it came out on this first experiment...


Not too bad, but I had to crop the photo to focus just on the card and still had to use auto correct as it was still a little too dark. The big plus was that there was no yellowing that I got from my normal home lighting and I didn't even use a full spectrum bulb. The cheap lamp I got was really wobbly too which could be dangerous! It's definitely going back for refund and looks like I'll be spending that £70 afterall.
I don't know about your parents, but it's always really difficult to buy for mine. Firstly, they own everything they really want or need and, secondly, they don't want me to spend money on them - sound familiar?!! Instead of buying something my mum will just go and get a refund for, I thought I would make her some Christmas cards she can send this year. She seems to love my creations (even takes them into work to show them off! Talk about rose tinted glasses!) so I think it will go down well and we won't end up with our usual argument about "wasting money on her"! I don't mean to make her sound ungrateful - she just prefers me to put my hard earned cash towards my mortgage - what great mum!
Anyway, I'm waffling now. Must be the reduced champagne we got from Morrisons! ;)

Papers/cardstock: various Bazzill cardstock
Stamps: K&Co Amy Butler Lotus Floral stamp set, sentiment from Hero Arts Great Flourishes Messages
Mediums: Versafine Onyx Black, VersaMark Dazzle in Frost, for the butterfly VersaMagic in Purple Hydrangea, Perfect Plumeria and Eggplant
Accents: satin ribbon, paper flowers, heart pin, string - all from stash, button from BasicGrey Wisteria
Tools: sewing machine, Fiskars Upper Crest border punch, Spellbinders Label Four

Tuesday, 25 August 2009

Sweet Sunday Sketch Challenge 32 - my very first challenge!

Well I did it! I completed my very first challenge and I chose the Sweet Sunday Sketch Challenge 32. I'm so chuffed I did it, it was a lot of fun to do! And I even managed to come up with the design AND create it within 2 hours - I normally spend days thinking about the colours before I even start it! Having someone else provide the design really sped up the process - fabulous! I used Core-dinations green cardstock and distressed it with my BasicGrey file. Anyway, here it is and I hope you like it...


I love the My Minds Eye Bloom & Grow papers - I used the paper pack and of course used my new skill with my mini sewing machine (have I told you already that I'm madly love with stitching on cards?!!). I also love that Greeting Farm owl - sink into those eyes! The photo doesn't show it but I used a silver pearlescent chalk around the owl to help it pop a bit. I used sticky pads behind the image and the die cut flower to make them pop too - again the photo doesn't show it up well. All in all, I actually like my card!

The two photographs differ quite a lot - I've been playing with the editing software to try to improve my photos, but I can't seem to get the best from it yet. I think the trick is to take a great shot in the first place. I have been researching how to take great photos and found how to make a light box so that's my next project!

Now to go and celebrate my birthday today - it's present opening time!!

Papers/cardstock: My Minds Eye - Bloom & Grow paper pack (includes the die cut flower), Core'dinations cardstock
Stamps: The Greeting Farm - Forest Friends
Mediums: Pebbles Inc pearlescent chalks, Copic Caios, colour pencils on leaves, Versafine ink in sepia
Accents: BasicGrey button, Bazzill In Stitch'z white floss
Tools: Spellbinders Nestabilities Label, Scallop and Classic Circle

Tuesday, 18 August 2009

Wedding card

At last! I've created the wedding card for my friend! I mulled over it for ages because I wanted it to be perfect for her. Not sure if I achieved that but I think it's a style she'll like - simple and elegant. What do you think...?


I spent ages looking at all of the gorgeous papers I've bought and got myself into a twist with the choice! I turned to my stamp collection (not those kind of stamps!) and found a Gel-a-Tins damask stamp that I haven't touched yet (and there's a lot more of those, I can tell you!). I decided to create my own background. At first I wanted to get that flock look and tried various inks to make the flock stick to it, but it just wasn't giving me the coverage I was looking for! I abandoned the idea and just inked it up with my favourite Versafine black ink. After putting it all together, I felt it was a bit flat so I used Liquid Pearls in the middle of each "flower" of the Hero Arts background stamp. Not sure if you can see it in the photo below...


So, still not sure if I love it, but I do like it. Any advice on improving it would be most welcome!


Cardstock: Bazzill Basics
Stamps: Hero Arts Dots & Flowers, Gel-a-Tins Wallpaper Series #1, sentiment from the Papermania Boutique stamp set
Mediums: Versafine Onyx Black ink, Liquid Pearls Silver Pearl
Accents: Anita's silver satin ribbon, Anita's silver organza ribbon
Tools: Fiskars Scallop Sentiment border punch

LinkWithin

Blog Widget by LinkWithin