My lovely Blogger followers!

Showing posts with label VersaMark. Show all posts

Saturday, 2 November 2013

A tag for a thank you pressie

Quickly popping in to show you a tag I made using the gorgeous new There She Goes Give Thanks stamp set...


I kept it pretty simple - you don't need much with such lovely images.  Just a piece of ochre ric rac and some twine and - voila!  It's also perfect for this week's There She Goes challenge for "leaves" - there are certainly plenty of them around after our high winds on Monday!

Right, I am off to bed now - ttfn!


Wednesday, 23 October 2013

There She Goes Give Thanks Blog Hop Challenge!

It's day 2 of  the There She Goes Blog Hop Challenges to showcase more of the October new release!  Today we are showing you the new Give Thanks stamp set by our sweet illustrator Chaitali...


Here is my Trendsetter make using this beautiful set...


I love this set - so grown up compared to the cuties I usually design with!  I simply stamped the leaf stamp using Versamark Brilliance ink for a soft sheen and my Darice embossing folder for texture.


Thanks for visiting and I'll be back tomorrow with day 3 of the There She Goes October release - see ya then!


Friday, 11 March 2011

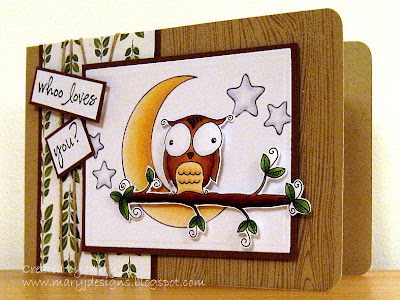
Whoo loves you?

It's Friday - yay!  And my card today is this cute little Burt The Owl by Pollycraft - I just love him!  The challenge over at Pollycraft Monday challenge this week is "fly me to the moon" so the perfect excuse to get him coloured in!


I used the Hero Arts woodgrain background and embossed it with clear powder to create a subtle background - perhaps too subtle, lol!!

That's it from me today - have a great weekend everyone!


I am also entering my card into the following challenges:


Paper/cardstock: Bazzill cardstock, Scenic Route Providence paper collection
Stamps: Pollycraft Burt The Owl, Stamp Fairy Moon Sky, Hero Arts woodgran background, CC Designs sentiments
Mediums: Copics, Versamark Watermark stamp pad, detail clear embossing powder
Accents: twine from stash
Tools: Nestabilities rectangle and label die inside card

Friday, 12 February 2010

Smooch!

Phew! I managed to make my hubby's Valentine's card at last. He doesn't really appreciate cards (let along handmade ones!) and he's not the romantic type either so I always struggle to make him cards! He does have a great sense of humour though so I thought I'd do something less soppy and more in keeping for what I like getting from him - kisses!

As I always find it so hard to make cards with clean lines (always look so unprofessional!), I decided to use a lot of texture - clear embossing powder on the dotted side border, embossed black matting, white linen cardstock for the background and hearts AND used Diamond Glaze on the lips. And of course my fav foam pads behind the heart in the foreground and the lips. This card took me ages!
I am entering this card into three challenges this week. Firstly, Mercy's Tuesday Sketch Challenge #60 (which I didn't think I'd be able to manage as it looked so difficult!)...


Secondly, Crazy for Challenges #23 "Be My Valentine" and, lastly, By the Cute and Girly February challenge to make a card themed around "love" (just found this blog!).


Papers/cardstock: Papermania white linen cardstock, red and black smooth cardstock, red foam sheet
Mediums: Versamagic Red Magic ink, Versamark ink, clear embossing powder, Diamond Glaze (on lips)
Stamps: Inca lips, Hero Arts dots background stamp
Accents: Stampin' Up ribbon
Tools: Woodware heart punch, Cuttlebug houndstooth embossing folder, Quickutz Neat Freak alphabet dies, Wizard die cutter

Sunday, 6 September 2009

Happy Birthday Mum Take Two!!

I'm going to keep this one short after all my waffling yesterday! As I said then, I just wasn't happy with the card I made for my mum's birthday (yesterday's post here). After some cogitating I came up with this version instead...

And here it is front on...


I much prefer this! I think the balance is better and I prefer the less fussy flower arrangement. Now just to create an insert to go with it. And to find someone to give the other card to!
Papers/cardstock: various Bazzill cardstock
Stamps:
K&Co Amy Butler Lotus Floral stamp set, sentiment from Hero Arts Great Flourishes Messages
Mediums: Versafine Onyx Black, VersaMark Dazzle in Frost, for the butterfly VersaMagic in Purple Hydrangea, Perfect Plumeria and Eggplant
Accents: ribbon and flowers from stash, button from BasicGrey Wisteria
Tools: sewing machine,
Fiskars Upper Crest border punch, Spellbinders Label Four

Saturday, 5 September 2009

Happy Birthday Mum!

Luckily my mum is IT illiterate and wouldn't know what a blog was if it was staring right at her! So I can upload the photo of the card I made for her birthday (this coming Friday) and I won't spoil the surprise. Because it's for my mum, I obviously wanted this card to be as special as possible. I'm still not 100% happy about the end result, but I have some time to experiment and improve it before Friday! Anyway, for this card I had three "wants":
  1. To create a card purely from my own imagination and not to rely on any sketches or challenges
  2. To use my sewing machine that she bought me last year and I only learnt to use it a couple of weeks ago (see here)!
  3. To use my DCWV Far East papers as my mum originated from Hong Kong
I failed on the last one. No matter how much I played around with the Far East papers, I just couldn't get any inspiration! I still wanted to stick with the purple shades in there though and ended up creating this...


What do you think? I don't think it's too bad overall, but I don't like the flower arrangement - there's something not right about it but I'm not sure what it is!! It doesn't balance with the sentiment properly either. And I think the satin ribbon is too thin. Will have a think on that...
I do like the butterfly though! It's from the K&Co Amy Butler Lotus Floral stamp set. It wasn't easy to find in the UK, but I managed to buy it from Charmed Cards & Crafts (scroll down half the page via the link). I haven't used it before because I wasn't sure how to make the best of it and what I eventually did was to colour it with three varying shades of purple ink and then used a character shaper and moulding mat (normally used for floral punch craft) to make it pop - I think it worked quite well. You can buy the tools from Crafts U Love here. I also wanted to give the butterfly a slight sheen to it too. You can't see it in the photo, but I used a VersaMark Dazzle in Frost and stamped it directly onto some white thick card. I then dried it with my heat tool and then stamped the inked butterfly onto it. Originally I stamped the butterfly and then the Versamark ink on top but it diluted the colours too much. I then cut out the butterfly and stuck it on with PVA glue.
I used to be rubbish at cutting, but I found micro serrated scissors and now it's easy peasy! Before my cut outs looked messy, but now they look like professional die cuts! Well, perhaps not that good, but pretty close!
The other thing I wanted to mention is that I've eventually done some research into improving how I photograph my cards. I found some very easy cheap solutions but in reality it's really hard to buy the lighting and spend less than £70. Does that sound a lot or not? It's probably not, but I've read on blogs that they've done it on the cheap so I'm reluctant to spend any more than I need too! Anyway, what I did was to create the background using a white A4 folder, thick white paper, double sticky tape (lots of it!) and a cheap £20 desktop adjustable lamp. I haven't yet sorted out a full spectrum bulb but thought the results with the energy saving bulb (11 watt, equivalent to a normal 75 watt) that came with the lamp worked quite well. Here's how it came out on this first experiment...


Not too bad, but I had to crop the photo to focus just on the card and still had to use auto correct as it was still a little too dark. The big plus was that there was no yellowing that I got from my normal home lighting and I didn't even use a full spectrum bulb. The cheap lamp I got was really wobbly too which could be dangerous! It's definitely going back for refund and looks like I'll be spending that £70 afterall.
I don't know about your parents, but it's always really difficult to buy for mine. Firstly, they own everything they really want or need and, secondly, they don't want me to spend money on them - sound familiar?!! Instead of buying something my mum will just go and get a refund for, I thought I would make her some Christmas cards she can send this year. She seems to love my creations (even takes them into work to show them off! Talk about rose tinted glasses!) so I think it will go down well and we won't end up with our usual argument about "wasting money on her"! I don't mean to make her sound ungrateful - she just prefers me to put my hard earned cash towards my mortgage - what great mum!
Anyway, I'm waffling now. Must be the reduced champagne we got from Morrisons! ;)

Papers/cardstock: various Bazzill cardstock
Stamps: K&Co Amy Butler Lotus Floral stamp set, sentiment from Hero Arts Great Flourishes Messages
Mediums: Versafine Onyx Black, VersaMark Dazzle in Frost, for the butterfly VersaMagic in Purple Hydrangea, Perfect Plumeria and Eggplant
Accents: satin ribbon, paper flowers, heart pin, string - all from stash, button from BasicGrey Wisteria
Tools: sewing machine, Fiskars Upper Crest border punch, Spellbinders Label Four

LinkWithin

Blog Widget by LinkWithin